¶ Chapter 4 — ALL-CERAMIC FIXED PROSTHODONTIC RESTORATIONS
Reference Edition
This chapter is part of the Air Force Dental Laboratory Manual (2005) – Digitally Restored Edition.
This edition preserves the original publication while correcting OCR errors, restoring formatting, reconstructing damaged tables where necessary, and improving digital readability.
The technical content has not been rewritten, modernized, expanded, or altered.
It is provided as a professional reference. Modern instructional material is published separately throughout DentalTechnology.org.
¶ Section 4A — Introduction
¶ 4.1. Overview
4.1.1. Changing times and patient needs have brought about viable alternatives to the traditional metal-ceramic system. Today’s patients are more health and esthetic conscious. To answer those needs, all-ceramic systems have come on the market that offer excellent alternatives to porcelain fused to metal.
4.1.2. The primary advantage of all-ceramic restorations is improved esthetics. Metal-ceramic restorations do not transmit light through the metal substructure. Light transmission through an all-ceramic restoration more closely resembles nature and, therefore, greatly enhances esthetics. The elimination of the metal collar and darkened subgingival areas are also an advantage to the all-ceramic restoration.
4.1.3. In addition to esthetic benefits, all-ceramic restorations may exhibit improved biocompatibility over traditional metal-ceramic restorations. Abrasion resistance with some systems is more similar to natural teeth, thereby minimizing wear of opposing dentition. Ceramic materials are more compatible with oral tissue than metal, preventing corrosion and tissue reaction.
4.1.4. All-ceramic restoration systems can be used for crowns, inlays, onlays, and veneers. Also, with new materials on the market today, some metal-free FPDs can be made if the technician practices strict adherence to the manufacturer’s guidelines. Two of the more popular all-ceramic systems, In-Ceram® by Vident and IPS Empress® by Ivoclar North America, are discussed in Sections 4B and 4C, respectively.
¶ 4.2. Preparation Requirements
4.2.1. All-ceramic restorations require more extensive tooth reduction and strict adherence to dimensional guidelines. Stress distribution is of great concern when designing the all-ceramic restoration. A correctly designed preparation will provide uniform stress distribution without points of stress concentration, which might result in fracture of the resultant restoration. The preparation should be smooth, nonwavy, with no sharp angles or edges. Even reduction of tooth structure is essential for success.
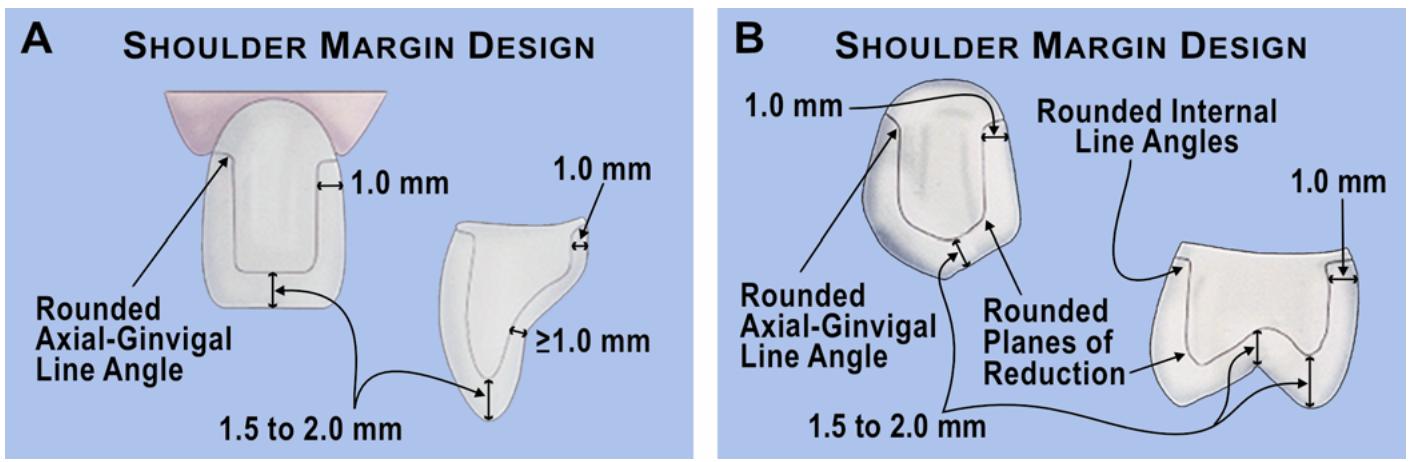
4.2.2. Crowns require a reduction of 1.5 mm on the axial walls and 1.5 to 2 mm on the occlusal or incisal surface. The margin is prepared as a 0.6 to 1.2 mm shoulder with a rounded axial-shoulder line angle (Figure 4.1). Margins with shoulders greater than 100- to 110-degree bevels or knife edge should be avoided. Veneers should have a uniform reduction of 0.6 to 1 mm with a chamfer at the gingival margin. More specific requirements can be found in the manufacturer’s directions for the different types of all-ceramic systems.
¶ Section 4B — In-Ceram® System
¶ 4.3. Overview
In-Ceram® is a registered trademark of VITA Zahnfabrik, Bad Sackingen, Germany, and distributed in North America by Vident. In-Ceram® Alumina is a glass infiltrated aluminous oxide ceramic substructure on which VitaDur® Alpha porcelain is fired to complete the restoration. In-Ceram® provides a ceramic technique for producing high strength all-porcelain crowns and three-unit anterior
FPDs. To begin, complete a master cast with removable dies, using the techniques described in Chapter 1, Section 1F.
Figure 4.1. Preparation Requirements for All-Ceramic Crowns.
¶ 4.4. Procedures
Once the master cast is completed, proceed as follows:
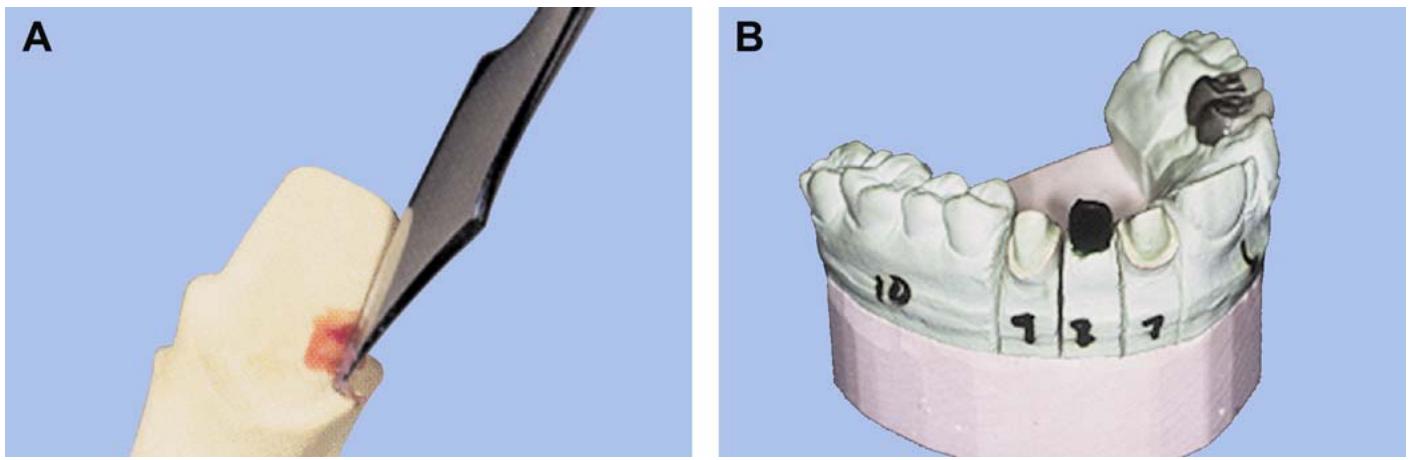
4.4.1. Die Preparation. Block out any defects or undercuts on the die with blockout wax and apply interspace varnish (die spacer) (Figure 4.2-A). Application of any other materials to the die is not recommended (including die sealers and hardeners on the margin). These materials are removed in later steps and leave space between the In-Ceram® core and die. If the treatment plan calls for construction of an FPD, wax a prop on the edentulous ridge to provide support for building up the pontic during later steps. The prop must taper to avoid any undercut from an incisal or proximal view (Figure 4.2-B). If built too far facially, the connector’s strength will be insufficient. If built too far lingually, the FPD will require extensive pontic substructure buildup that must be reduced later.
Figure 4.2. Die Preparation for In-Ceram® Restoration.
4.4.2. Duplication. Duplicate the model with a highly accurate impression material (Figure 4.3- A). Polyvinylsiloxane materials or addition polymerizing silicone are recommended. Because only the prepared site needs impressing, a small, disposable, quadrant impression tray is quite suitable. Use a putty and wash technique of heavy and light body impression materials to create the impression. Inspect the impression for margin integrity.
4.4.3. Special Plaster Model.
4.4.3.1. Spray the impression with a wetting agent and blow it dry. Strictly follow the manufacturer’s instructions for mixing and pouring special plaster. Separate the mold after 2 hours and flatten the base (Figure 4.3-B), taking care not to wet the model when trimming (dry grind).
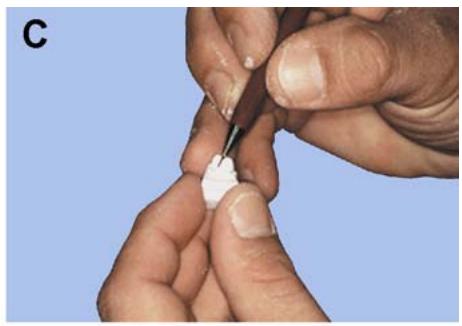
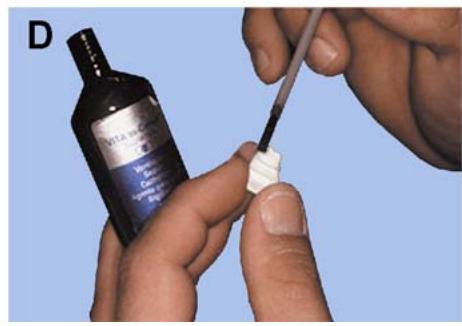
4.4.3.2. Mark the margins with a graphite pencil and apply a thin coat of sealant to the FPD abutments only (Figure 4.3-C and -D)
Do not seal any other areas.
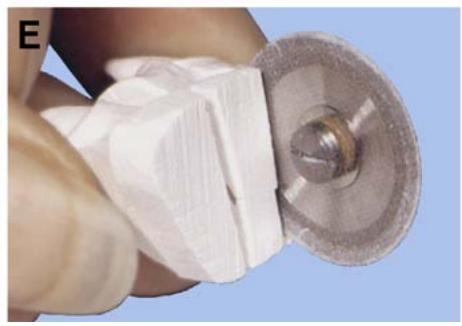
4.4.3.3. Partially section the base of the FPD plaster model with a die saw (Figure 4.3-E)
Attach the base to the aluminum oxide slab with cyanoacrylate adhesive and then continue sectioning the model. Plaster models for single unit restorations need only be flattened on the base to prevent the cast from falling over while firing. The special plaster models are now ready for slip application.
Figure 4.3. Fabrication of Refractory Cast for In-Ceram® Restoration.
natural_image
3D rendered image of a red cylindrical object with green top and a small white dip, against a plain blue background (no text or symbols)
natural_image
Close-up of a textured, circular object with a small white object on top, possibly a sample or artifact (no visible text or symbols)
natural_image
Close-up of hands using a tool to apply a small white object to a finger (no text or symbols visible)
text_image
D
VIT-10
Vit 10
Vit 20
Vit 30
Vit 40
Vit 50
Vit 60
Vit 70
Vit 80
Vit 90
Vit 100
Vit 110
Vit 120
Vit 130
Vit 140
Vit 150
Vit 160
Vit 170
Vit 180
Vit 190
Vit 200
Vit 210
Vit 220
Vit 230
Vit 240
Vit 250
Vit 260
Vit 270
Vit 280
Vit 290
Vit 300
Vit 310
Vit 320
Vit 330
Vit 340
Vit 350
Vit 360
Vit 370
Vit 380
Vit 390
Vit 400
Vit 410
Vit 420
Vit 430
Vit 440
Vit 450
Vit 460
Vit 470
Vit 480
Vit 490
Vit 500
Vit 510
Vit 520
Vit 530
Vit 540
Vit 550
Vit 560
Vit 570
Vit 580
Vit 590
Vit 600
Vit 610
Vit 620
Vit 630
Vit 640
Vit 650
Vit 660
Vit 670
Vit 680
Vit 690
Vit 700
Vit 710
Vit 720
Vit 730
Vit 740
Vit 750
Vit 760
Vit 770
Vit 780
Vit 790
Vit 800
natural_image
Close-up of a hand holding a white plastic object with a metallic rim, against a plain blue background (no text or symbols visible)
4.4.4. Mixing Slip Material.
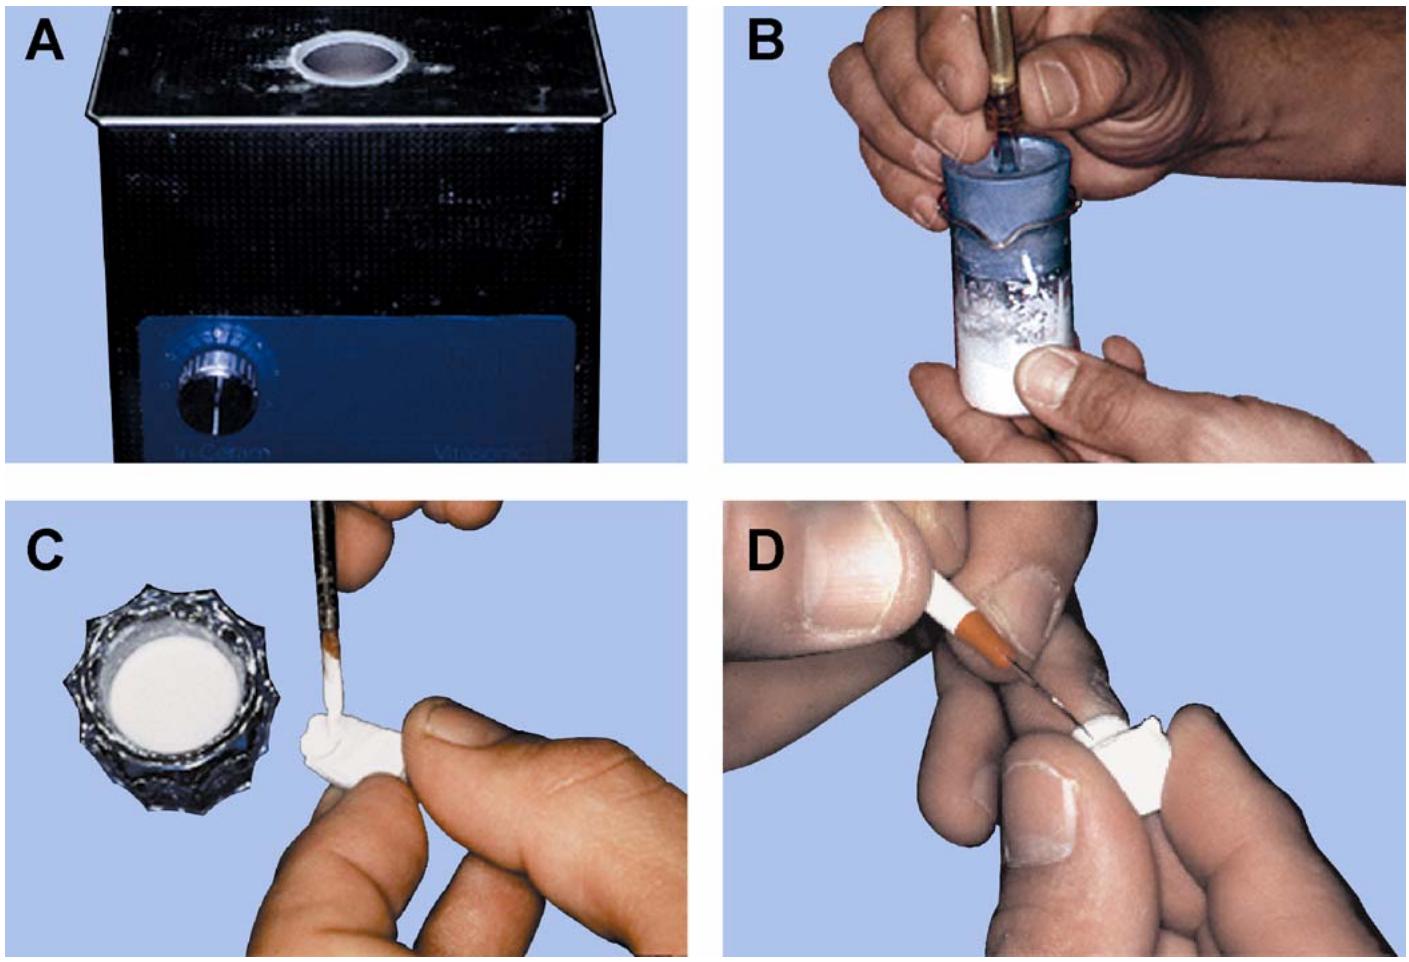
4.4.4.1. Weigh out exactly 38 grams of VITA In-Ceram®, Alumina Powder. Pour the contents of one ampoule of powder liquid and one drop of In-Ceram additive in the glass-mixing vessel and premix for a few seconds in the Vitasonic II (Figure 4.4-A).
4.4.4.2. Next, place the glass beaker on a vibrator and slowly mix in the alumina powder with a glass mixing rod. (This important step can seem tedious because the particle size of the slip is very fine and does not wet easily with such a small amount of liquid.) Interrupt the mixing process three times to place the mixing vessel in the Vitasonic II for 2 minutes each. Be sure to remove the glass rod before mixing ultrasonically. Once the entire amount of powder has been added, place the mix in the Vitasonic II for 7 additional minutes.
4.4.4.3. The finished mix should be homogenous. Place the prepared slip under vacuum for one minute (Figure 4.4-B) and then pour it from the glass mixing beaker into a plastic cup.
Figure 4.4. Mixing and Applying Slip Material for In-Ceram® Restoration.
4.4.5. Slip Application.
4.4.5.1. Slip application is accomplished with a #4 synthetic fiber brush. The material needs to flow off the brush without locking into place (Figure 4.4-C). The moisture content is absorbed into the plaster and previous layers of material, creating a dense rigid coping and substructure resembling wet chalk.
4.4.5.2. Although the finished substructure’s dimensions should follow standard criteria, the slip material should be slightly overbuilt and reduced after sintering is complete. Copings and retainers must be at least 0.5 mm thick and connectors should be as large as possible.
4.4.5.3. Use a sharp flexible #15 scalpel for carving and shaping margins (Figure 4.4-D)
Carving the slip material increases chances of cracking the buildup. Therefore, adjustments should be accomplished after sintering when possible. Prior to sintering, apply a layer of In-Ceram Stabilizer to the completed slip buildup after a waiting time of 30 minutes.
4.4.6. Sintering and Finishing.
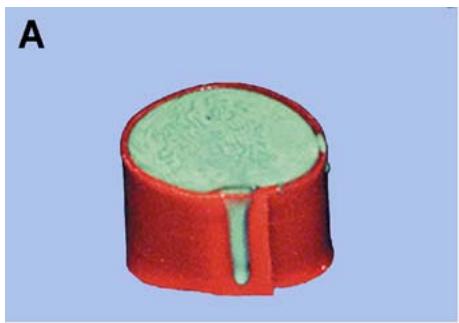
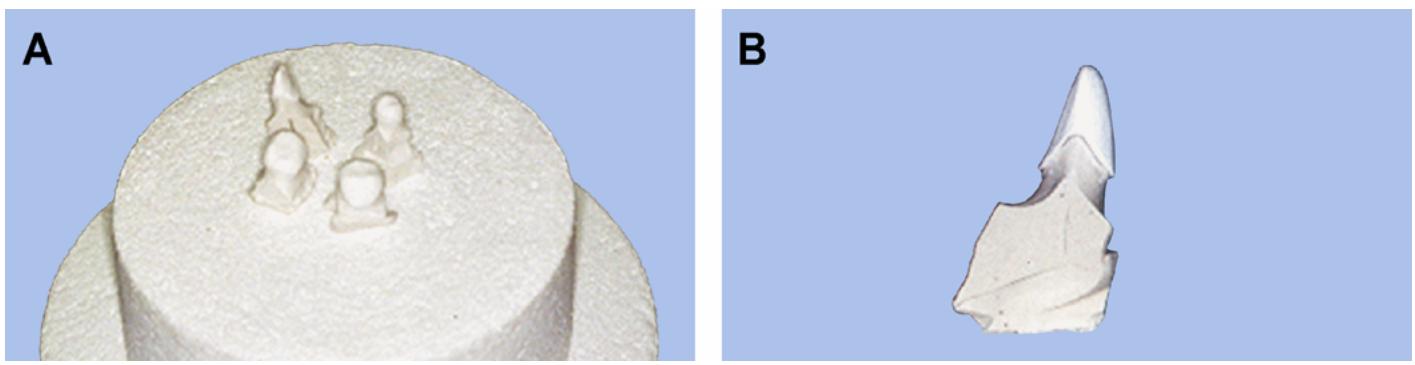
4.4.6.1. The sintering process shrinks the special plaster model, leaving the slip material accurately intact (Figure 4.5-A)
The firing program is approximately 10 hours long—6 hours to reach 120°C, 2 hours to reach 1120°C, and a 2-hour hold. Cool the furnace to 400°C before opening the firing chamber. Then cool the substructure to room temperature before handling. Refer to the manufacturer’s instructions for more detailed guidance.
4.4.6.2. Remove the die spacer from the master model and gently seat the substructure (Figure 4.5-B)
Adjust fit and contours with a fine diamond rotating at low speed. The minimum thickness is 0.5 mm on the facial and lingual surfaces and 0.7 mm occlusally. Proper contours and function must be established before glass infiltration because future adjustment is not possible.
Figure 4.5. Sintering and Finishing In-Ceram® Restoration.
4.4.7. Glass Infiltration.
4.4.7.1. Color match the infiltration glass to specific Vita Lumin shades. Mix the appropriate porcelain with distilled water and apply the mixture to the outside of the restoration (Figure 4.6-A). Leave a portion of the pontic uncovered if fabricating an FPD. The infiltration glass must be absorbed into the slip material like a sponge absorbing water from a countertop. If the entire pontic is covered, an air pocket will be trapped in the center of the pontic, resulting in an area of slip material not infiltrated by the glass. This condition will compromise the strength of the FPD.
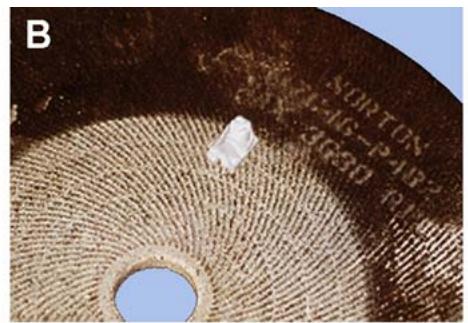
Figure 4.6. Glass Infiltration of an In-Ceram® Crown.
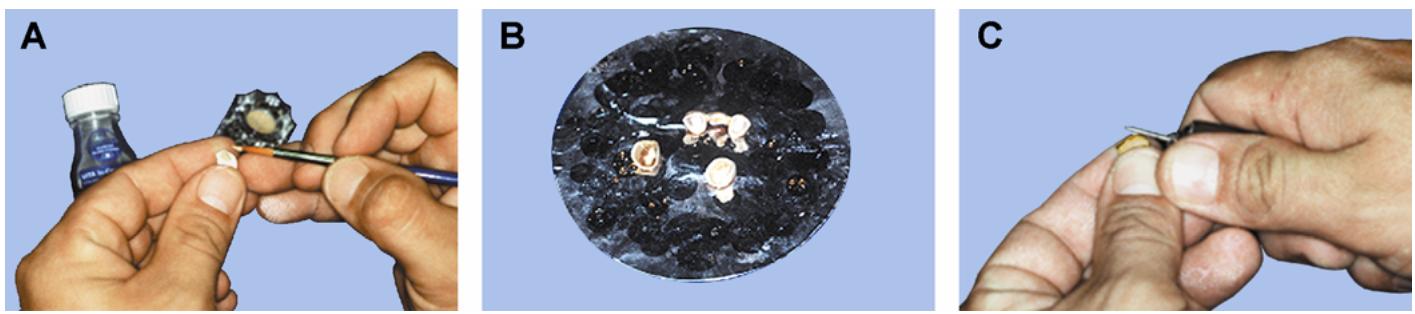
4.4.7.2. Place the unfired restoration on the special, platinum firing tray and fire it according to manufacturer’s directions. The firing program includes a 4 to 6 hour hold time at 1100°C in order to allow the infiltration glass to be absorbed by the sintered slip material (Figure 4.6-B).
4.4.7.3. After firing, remove any excess infiltration glass with a coarse diamond (Figure 4.6-C) and sandblast the remaining glass with aluminum oxide. The substructure must be refired and sandblasted again to ensure no infiltration glass remains on the surface. Refer to the manufacturer’s instructions for details.
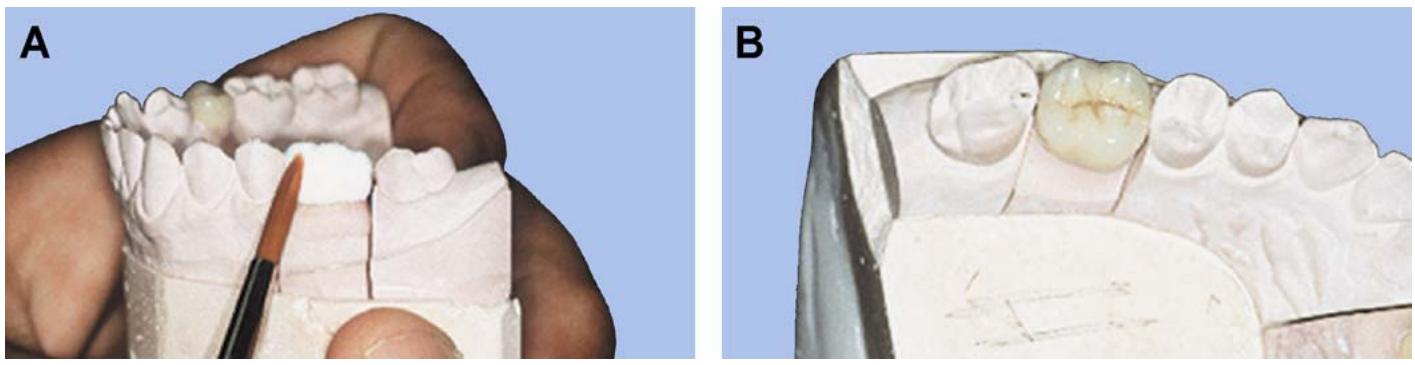
4.4.8. Porcelain Application. Porcelain application is accomplished using VitaDur Alpha aluminous porcelain. Normal porcelain modification and layering techniques are used to complete the buildup (Figure 4.7-A). Follow the manufacturer’s directions for firing and glazing the restoration (Figure 4.7-B). Different substructure materials are available for different applications, such as “Spinell” for anterior single unit restorations requiring increased translucency or “Zirconia” for a three-unit posterior FPD.
Figure 4.7. In-Ceram® Restoration Porcelain Application.
¶ Section 4C — IPS Empress® System
¶ 4.5. Overview
IPS Empress® is a leucite-reinforced glass ceramic manufactured in ingots of different shades and opacities. The ceramic ingots are pressed into molds formed by using the lost wax technique. There are currently two different systems available—IPS Empress®, used for inlays, onlays, crowns, and veneers, and IPS Empress® 2, used for all of the above plus all-ceramic FPDs. The IPS Empress® system can be used with either of the following methods of fabrication—the staining technique (paragraph 4.6) or the layering technique (paragraph 4.7).
¶ 4.6. Staining Technique
The crown or veneer is waxed to full contour, sprued, invested, and then burned out in a conventional burnout oven. After burnout, the mold is transferred to the IPS Empress® EP500 pressing furnace where a neutral base ceramic ingot is pressed into the mold. The pressed pattern is recovered and fit to the master die. Pigmented characterization ceramic (stain) is applied and fired in a conventional porcelain oven to achieve the desired dentin and enamel effects. Lastly, a fine-grained glazing material is applied and fired to provide a sealed surface with a natural appearing luster and texture.
¶ 4.7. Layering Technique
A dentin shade ceramic ingot is pressed just as in the shading technique. The ingots for the layering technique are shaded to correspond to dentin colors of the Vita Lumin and Chromascop™ shade guides. The pressed dentin core is contoured for enamel porcelain application. Modifiers and incisal porcelains are applied, conventionally fired, and contoured. The restoration is then glazed before insertion. Procedures for this technique are as follows:
4.7.1. Cast and Die Preparation. Construct a master cast with removable dies and articulate, using procedures given in Chapter 1, Section 1F, of this volume. Apply a removable die spacer to the dies and ensure the spacer does not cover any portion of the margin.
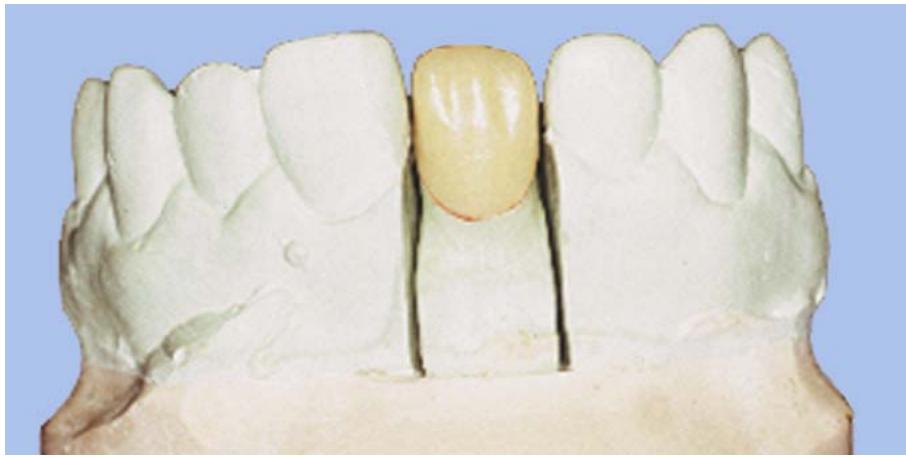
4.7.2. Wax-Up. Wax the crown to the exact desired full contour. At this point evaluate the wax-up for the minimum thickness necessary—1.5 mm axial surfaces, 2 mm incisally, and 1 mm shoulder margin. If the wax cutback technique is to be used, cut back the enamel portion, leaving approximately 1.0 mm wax thickness for pressing the dentin core (Figure 4.8). If the cutback will be accomplished in the pressed ceramic, refine the margins now.
Figure 4.8. Wax-Up for an IPS Empress® Crown.
natural_image
Close-up of a dental model showing upper and lower teeth with a central dentition (no text or symbols visible)
4.7.3. Spruing.
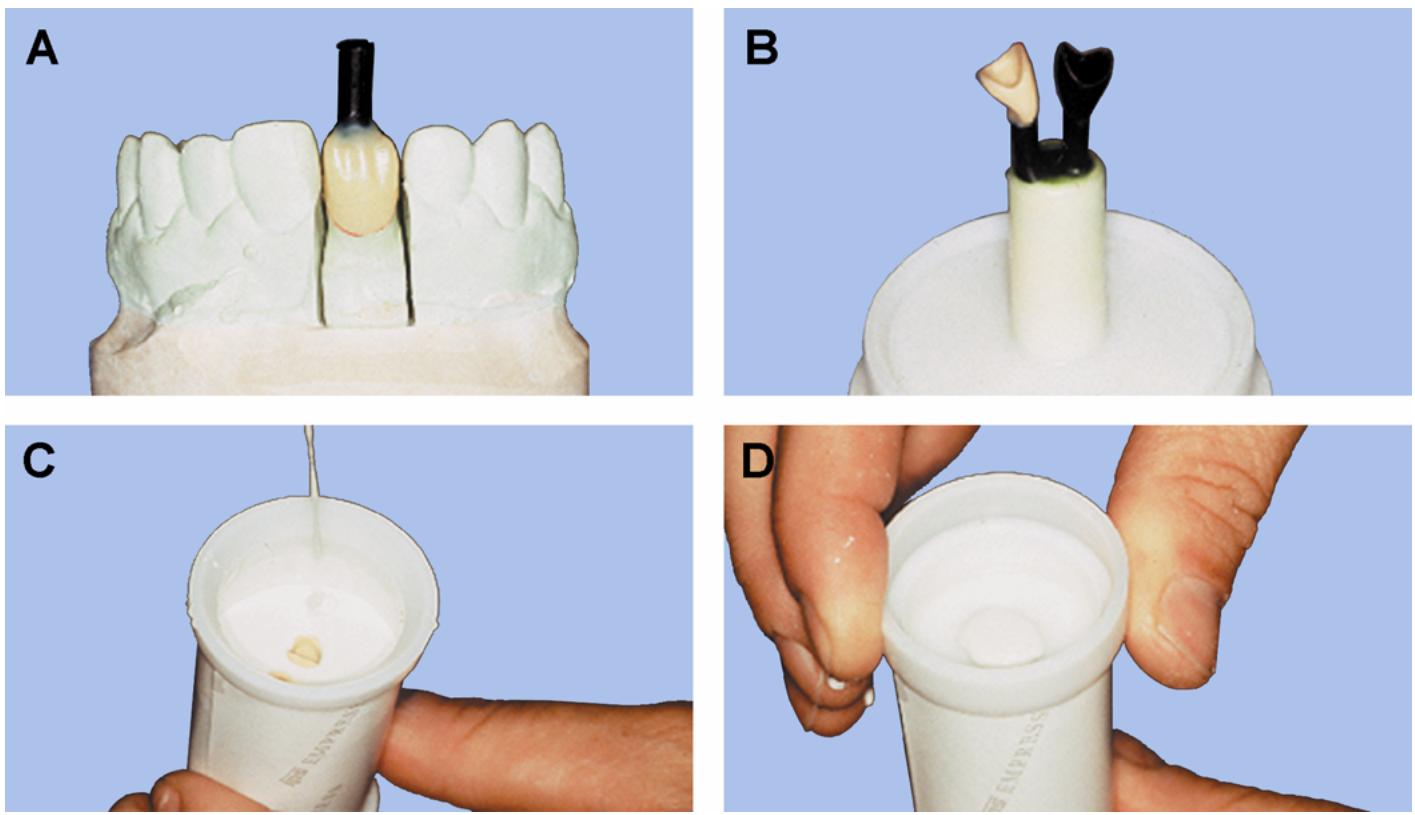
4.7.3.1. Attach a single 8-gauge sprue former, 6 to 8 mm long to the incisal area of anterior teeth or the noncritical cusp of posterior teeth. The attachment site should be flared and perfectly smooth to prevent any turbulence when ceramic material flows into the mold (Figure 4.9-A). Do not use multiple sprue formers to the same wax pattern because a suture line may be evident after porcelain pressing. (NOTE: Sprue two to three units of one shade when possible because ingots are expensive and material buttons cannot be pressed again.
4.7.3.2. Seal the opening of the ring base (sprue base) with wax and weigh the base. Attach the patterns on the ring base at least 3 mm apart and 10 mm from the sides of the paper ring (Figure 4.9-B).
4.7.3.3. Unlike conventional castings, sprued patterns must be placed in the thermal zone. The labial surface of anteriors should face center of the mold. This places the thickest portion of the pattern in the thermal zone.
4.7.3.4. Weigh the ring base with attached patterns and subtract the weight of the empty base. This figure is the exact wax weight of the wax patterns. If the pattern weight is less than .24 grams, invest an additional “dummy” pattern. This allows the furnace press plunger to travel at least 1 mm; otherwise, the pressing procedure will not end automatically. Patterns weighing .6 grams or less may be pressed from a single ceramic ingot. Patterns weighing between .6 and 1.4 grams will require 2 ingots of material.
4.7.4. Investing.
4.7.4.1. Select a paper investment ring and form a cylinder by pressing the adhesive side along the marked line. Place the ring base on one end of the paper ring and seat the ring stabilizer on the other end.
4.7.4.2. Choose the appropriate investment for the layering or staining technique. Investment for the layering technique is white in color and the staining technique investment is blue. Measure the investment and liquid per the manufacturer’s instruction chart and then vacuum mix for 60 seconds.
4.7.4.3. Carefully fill the cylinder just below the ring stabilizer, remove the ring stabilizer, and slowly position investment gauge (Figure 4.9-C and -D). The investment must press through the hole in the gauge. After setting, remove the gauge, ring base, and paper. Scrape only the rough dimple created by the investment gauge. DO NOT alter the 90-degree angle of the mold.
Figure 4.9. Spruing and Investing an IPS Empress® Crown.
4.7.5. Burnout and Pressing.
4.7.5.1. Select the appropriate ceramic ingots for the prescribed shade and place them with an alox plunger on the support tray. Place the mold and support tray into a cold burnout furnace (Figure 4.10-A). Heat at a rate of 3°C (or 37°F) per minute to 850°C (or 1560°F) and hold for 90 minutes.
Figure 4.10. Burnout and Pressing an IPS Empress® Crown.
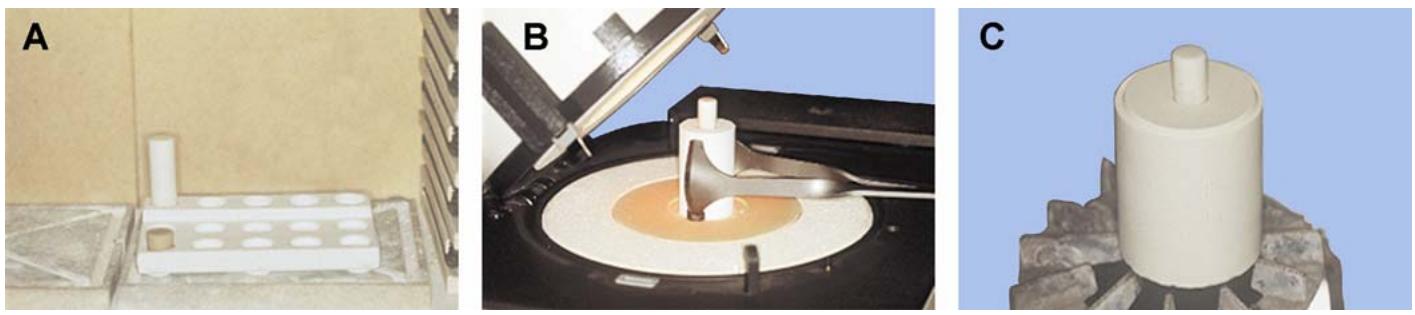
4.7.5.2. Remove the mold from the furnace with opening up and immediately place the ingots from the support tray into the hot mold. Place the alox plunger on top of the ingot, ensuring it is
fully seated in the mold (Figure 4.10-B).
Select the desired program. (Consult the
manufacturer’s pressing table for exact data.)
4.7.5.3. Position the loaded cylinder in the center of the pressing furnace, manually close the muffle, and press the start button. Check the vacuum and air pressure. The program will run automatically with an audio signal that indicates when the pressing process is complete.
4.7.5.4. The pressing cycle last approximately 45 minutes. To complete the cycle, remove the mold from furnace and place it on a raised wire rack surface to promote quick, even cooling of the pressed mold (Figure 4.10-C).
4.7.6. Recovery.
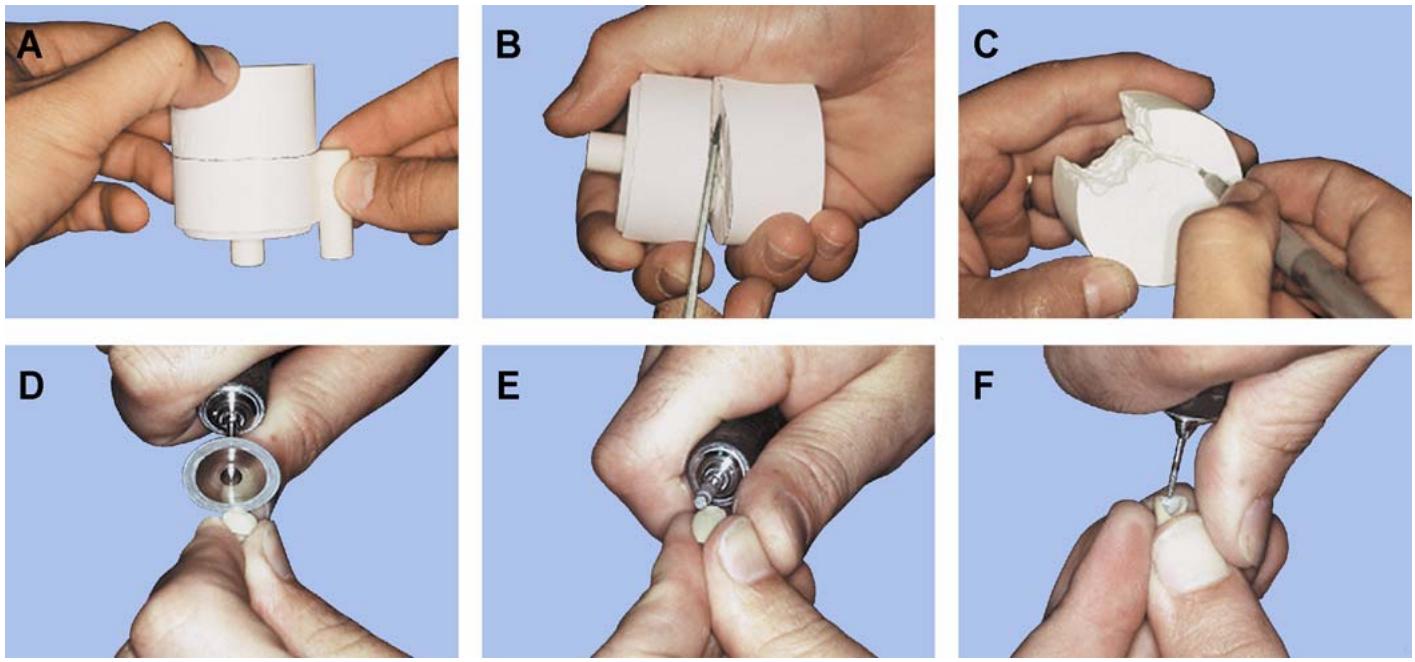
4.7.6.1. Position an unused alox plunger on the outside of the investment mold to measure the depth the first plunger traveled during the pressing. Mark this depth around the outside of the cooled mold (Figure 4.11-A).
4.7.6.2. Cut along the line with a large separating disk and pry at the line with a plaster knife (Figure 4.11-B)
Remove the remaining portion of the investment, using glass beads at 58 psi and reducing to 29 psi when the ceramic becomes visible (Figure 4.11-C).
4.7.6.3. Clean residual investment and ingot material from the plunger by blasting with aluminum oxide. Desprue units with a diamond disk and recontour the sprue attachment point (Figure 4.11-D and -E).
4.7.6.4. Gently position the ceramic unit on the die. If resistance is felt, apply a disclosing medium and carefully remove discrepancies with a diamond point (Figure 4.11-F).
Figure 4.11. Recovery of a Pressed IPS Empress® Crown.
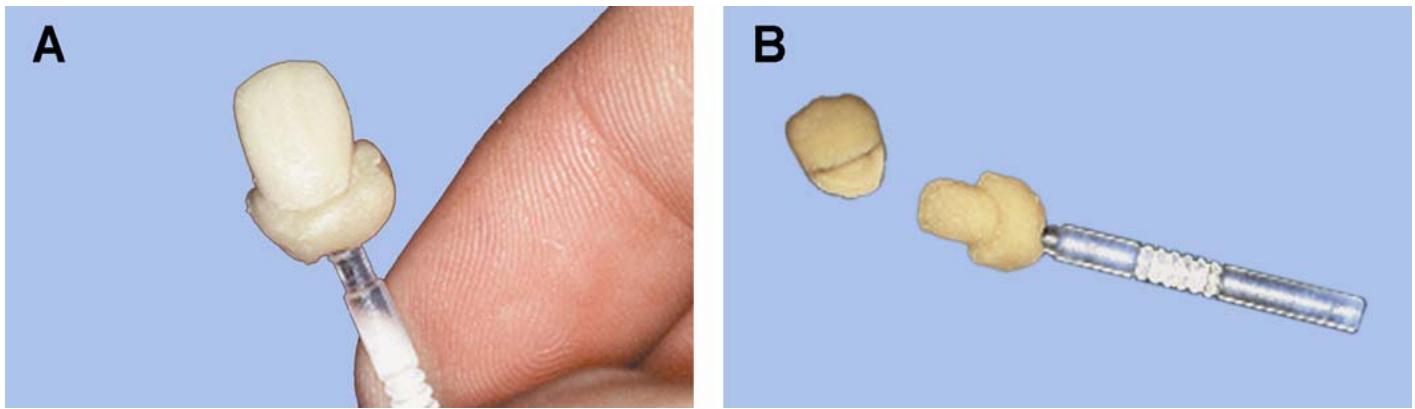
4.7.7. Fabrication of the Stumpf Die. A dentin-shaded die is used to evaluate restoration color during the incisal layering and staining procedures. This “stumpf die” is fabricated by using one of nine shades of flexible composite die material selected by the dentist after preparing the natural teeth. Coat the inner surfaces of the pressing with the separating liquid provided in the system. Apply the corresponding die material into the pressing and insert a die holder in the material (Figure 4.12). Light cure the die for 5 minutes in a light curing unit.
Figure 4.12. Stumpf Die Fabrication for an IPS Empress® Crown.
4.7.8. Crown Completion.
4.7.8.1. If the crown was pressed to full contour, reduce the enamel portion with diamonds or abrasives, leaving a dentin core of at least .8 mm. Take care not to generate heat while grinding the ceramic material. Excess heat will cause cracking of the pressed ceramic, requiring the restoration to be remade. Slight reduction of all axial surfaces is also necessary to allow for the application of a neutral material layer.
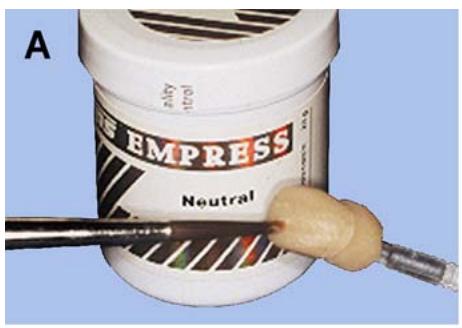
4.7.8.2. When contouring is completed, gently bead blast and steam clean the dentin core. Apply Empress® neutral material over the entire surface and fire in a porcelain oven (Figure 4.13-A).
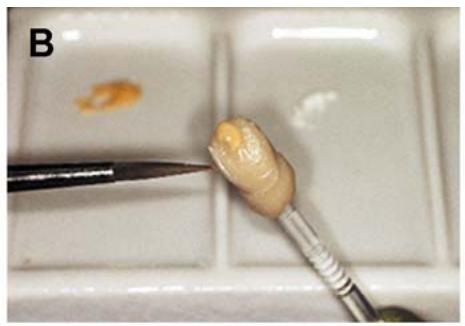
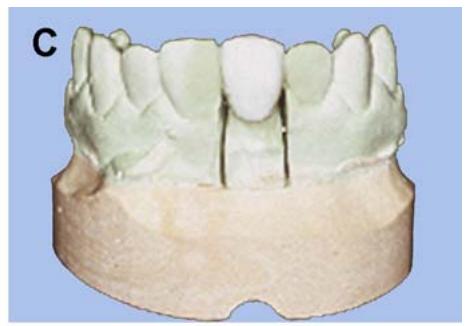
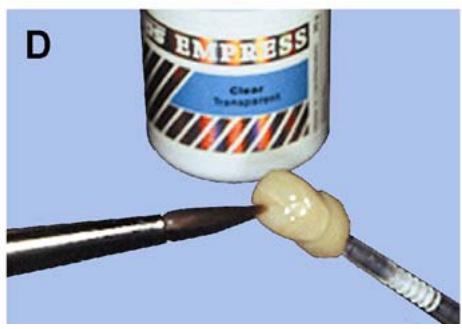
Figure 4.13. Completion of an IPS Empress® Crown.
text_image
A
EMPRESS
Neutral
natural_image
Close-up of a paintbrush applying yellow liquid to a white surface with a small orange substance, labeled 'B' in the corner (no other text or symbols visible)
natural_image
3D dental model showing upper and lower jaw teeth (no text or labels visible)
text_image
D
EM PRESS
Clear
Transparent
natural_image
Close-up of a dental model showing upper and lower teeth with a visible gum area (no text or symbols)
4.7.8.3. Next, characterize the dentin, if desired, by applying and firing stains or modifiers (Figure 4.13-B)
Apply incisal material to the full contour (Figure 4.13-C). Slightly overbuild the incisal layer and add to the proximal contacts to compensate for shrinkage during firing.
4.7.8.4. After firing the incisal layer, make any necessary final corrections to the shape of the restoration and apply one thin coat of glaze (Figure 4.13-D and -E). Minor corrections to contacts and margins can be accomplished, using Empress® add-on material in a manner similar to standard ceramic correction powders.
¶ Section 4D — Porcelain Laminate Veneers
¶ 4.8. Overview
An alternative to the full-coverage, all-ceramic crown is the porcelain laminate veneer. Veneers are a thin shell of porcelain covering the facial surface of the prepared tooth. Veneers offer the same esthetic advantages of the all-ceramic crown with a more conservative preparation. Veneers can be used to cover discoloration and enamel defects, close diastemas, repair chipped teeth, and correct slightly misaligned teeth. Many techniques are available for producing porcelain laminate veneers, including the platinum foil technique, refractory technique, and pressed ceramics. This chapter will discuss only the refractory technique.
¶ 4.9. Refractory Technique
4.9.1. Master Cast Preparation (Figure 4.14-A)
Pour the impression in die stone and allow to final set. Trim the cast to standard dimensions and remove any soft tissue interference from the margins and interproximal areas. Mark the margins with a red wax pencil and apply die spacer to within 1 mm of the margins. If possible, use a removable die spacer to allow for easier seating of the finished veneers on the master cast. Ensure the removable die spacer is compatible with the duplicating material used in the refractory cast fabrication (paragraph 4.9.2).
4.9.2. Refractory Cast Fabrication.
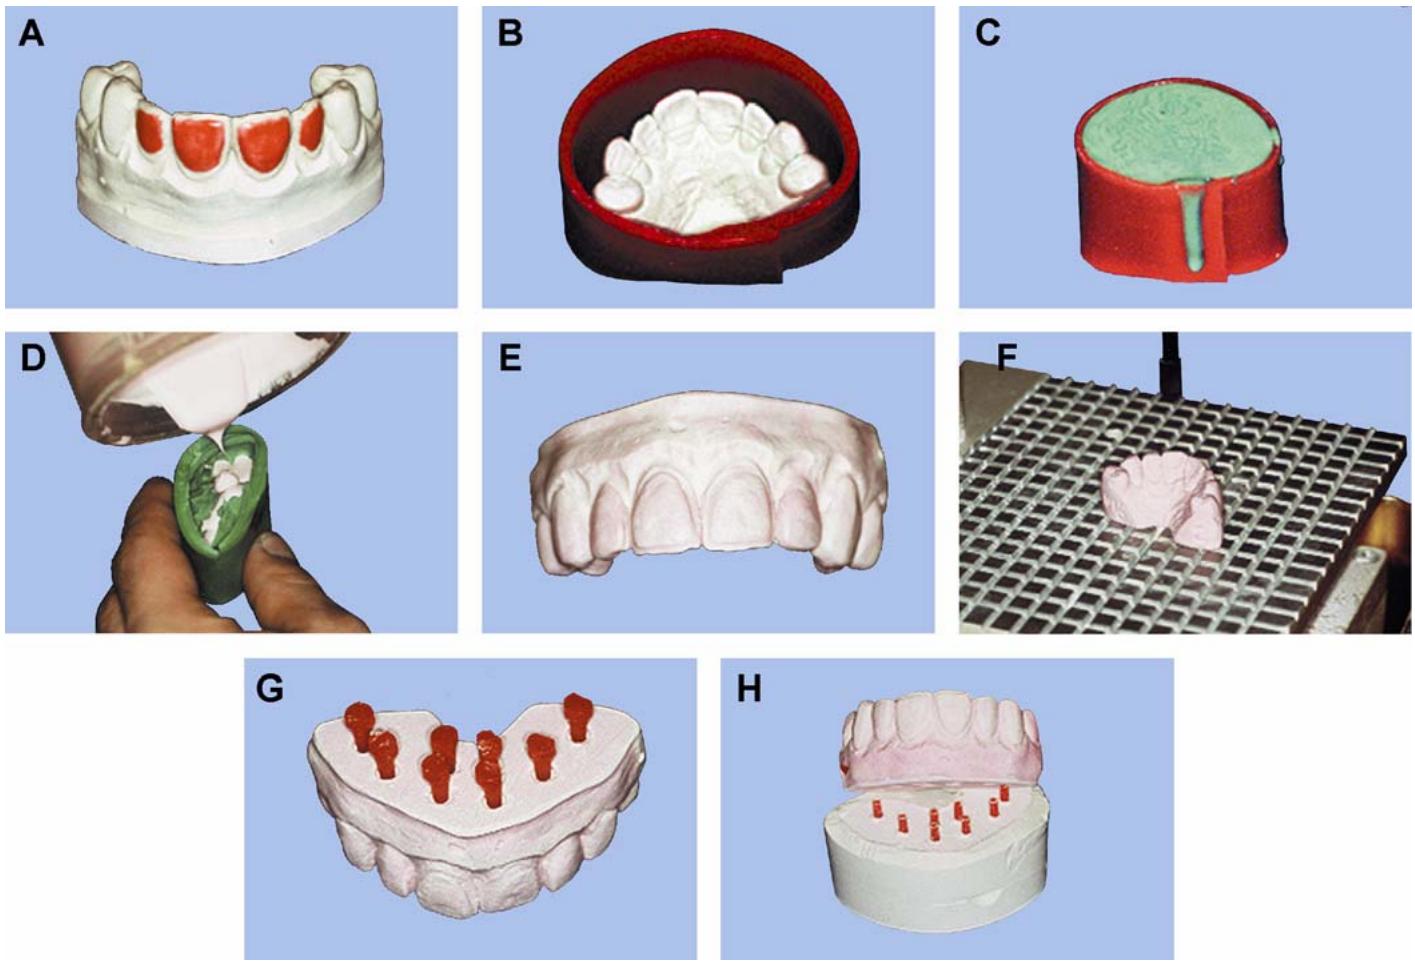
4.9.2.1. Box the master cast to include at least one adjacent tooth on both sides of the prepared teeth (Figure 4.14-B)
Using a high quality duplicating material, make a mold of the boxed portion of the master cast (Figure 4.14-C).
4.9.2.2. After the duplicating material has set, remove and inspect the impression for any voids particularly around the margins. Pour the mold with a refractory material designed for use with porcelain veneering systems. Pay close attention to the manufacturer’s directions (Figure 4.14-D).
4.9.2.3. Carefully remove the refractory cast from the duplicating material. Inspect the refractory cast for voids in any critical areas. Trim excess material from the base of the cast, ensuring the base is smooth and flat (Figure 4.14-E). Pin and base the cast, using the reverse pin technique (paragraph 4.9.2.4).
4.9.2.4. Seal the bottom of the cast with a die hardener, waterproof sealant. Drill two holes for each die using a pindex or parallel pinning machine (Figure 4.14-F). Insert the dowel pins into each hole. Do not glue the pins in place, but ensure the pins are stable (Figure 4.14-G). Box the cast and pour a stone base. After the stone has set, separate the base from the refractory cast (Figure 4.14-H). When using this technique, it is easier at this time not to separate the cast into individual dies. The cast will be sectioned into individual dies after the first firing and contouring have been accomplished. This method increases the stability of the dies during the porcelain application and contouring steps.
Figure 4.14. Master Cast Technique for Porcelain Laminate Veneers.
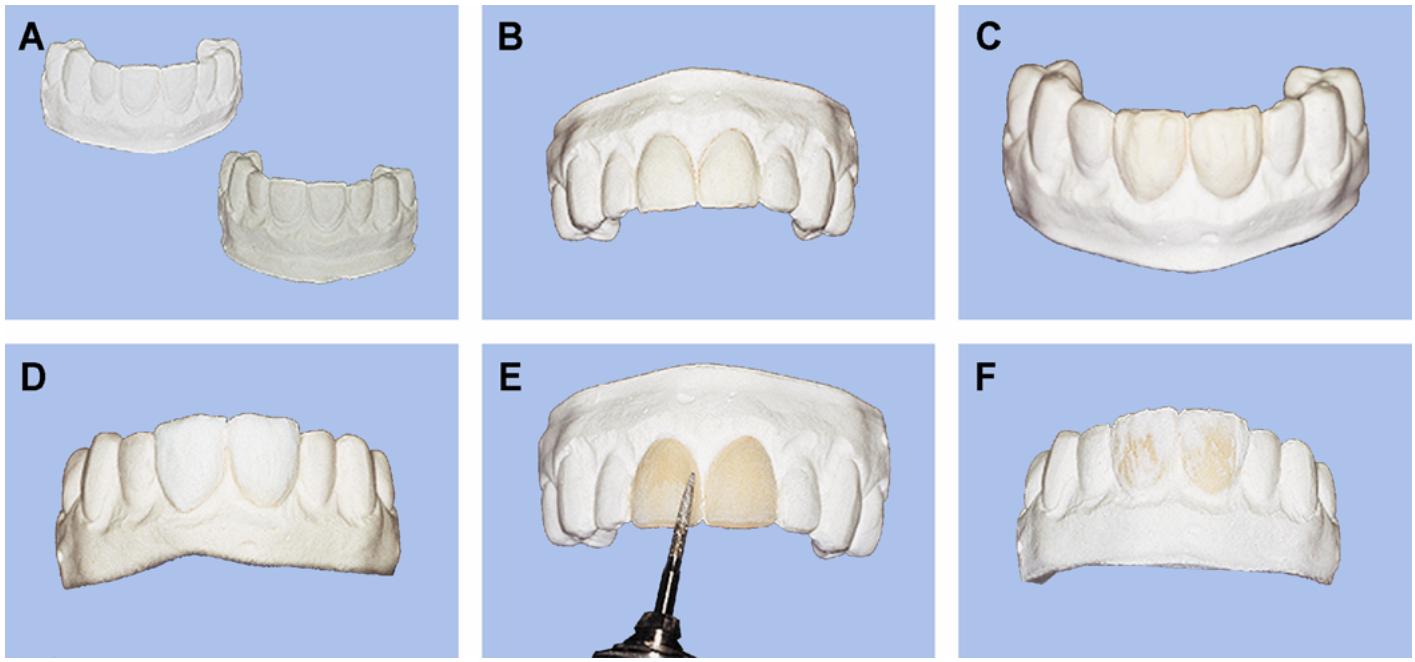
4.9.3. Cast Preparation. Degass the refractory cast in a burnout oven following manufacturer’s directions for the refractory material being used. After degassing, the refractory cast should exhibit a white color. Gray or black areas indicate the need for additional degassing (Figure 4.15-A).
4.9.4. Porcelain Application.
4.9.4.1. First, soak the refractory cast in distilled water to prevent the porcelain from drying out quickly during application. Repeat the soaking process after firing and before each new layer of porcelain is added. (The cast must be cooled completely before soaking.)
4.9.4.2. Mix and apply a masking porcelain layer (Figure 4.15-B)
The opacity and depth will vary depending on the esthetic requirements. If you are covering stains or discolored teeth, more masking porcelain is needed than if you are closing diastemas. Dry and fire the porcelain following manufacturer’s directions.
4.9.4.3. Mix and apply body porcelain to the cervical margin area and work toward the incisal, tapering to a sheer layer as the incisal edge is approached (Figure 4.15-C). Shape the mamelons with a brush if desired. Apply incisal porcelain from the incisal edge, tapering it onto body porcelain to create natural dentin-enamel blend (Figure 4.15-D). Cut through the embrasures with a sharp instrument to separate the veneers. Fire the veneers in a porcelain oven, using the manufacturer’s guidelines for time and temperature.
4.9.4.4. Contour the porcelain with a medium to fine grit diamond or stone (Figure 4.15-E)
If porcelain additions are necessary, thoroughly clean the veneers and then apply porcelain and fire it in accordance to the manufacturer’s guidelines (Figure 4.15-F).
Figure 4.15. Porcelain Application and Contouring.
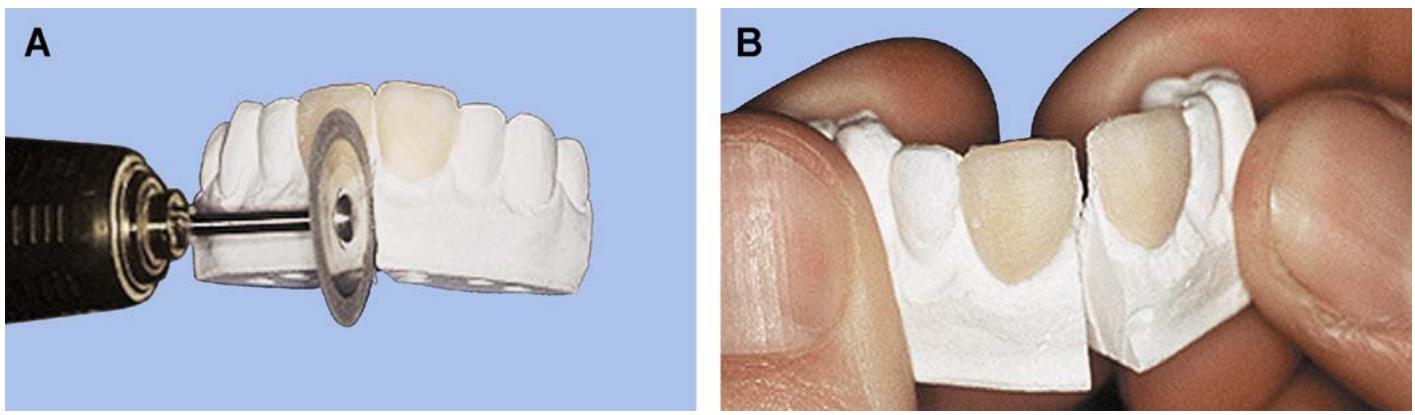
4.9.5. Section the Cast Into Individual Dies. Use a disc to cut section dies that are to be removable. Stop the cuts just shy of the interproximal contact areas (Figure 4.16-A). Use a knife to score a notch from the cut to the contact areas. Place thumbs on both sides of the cut and gently push together until the die breaks apart (Figure 4.16-B).
Figure 4.16. Sectioning the Cast Into Individual Dies.
4.9.6. Completing the Veneers.
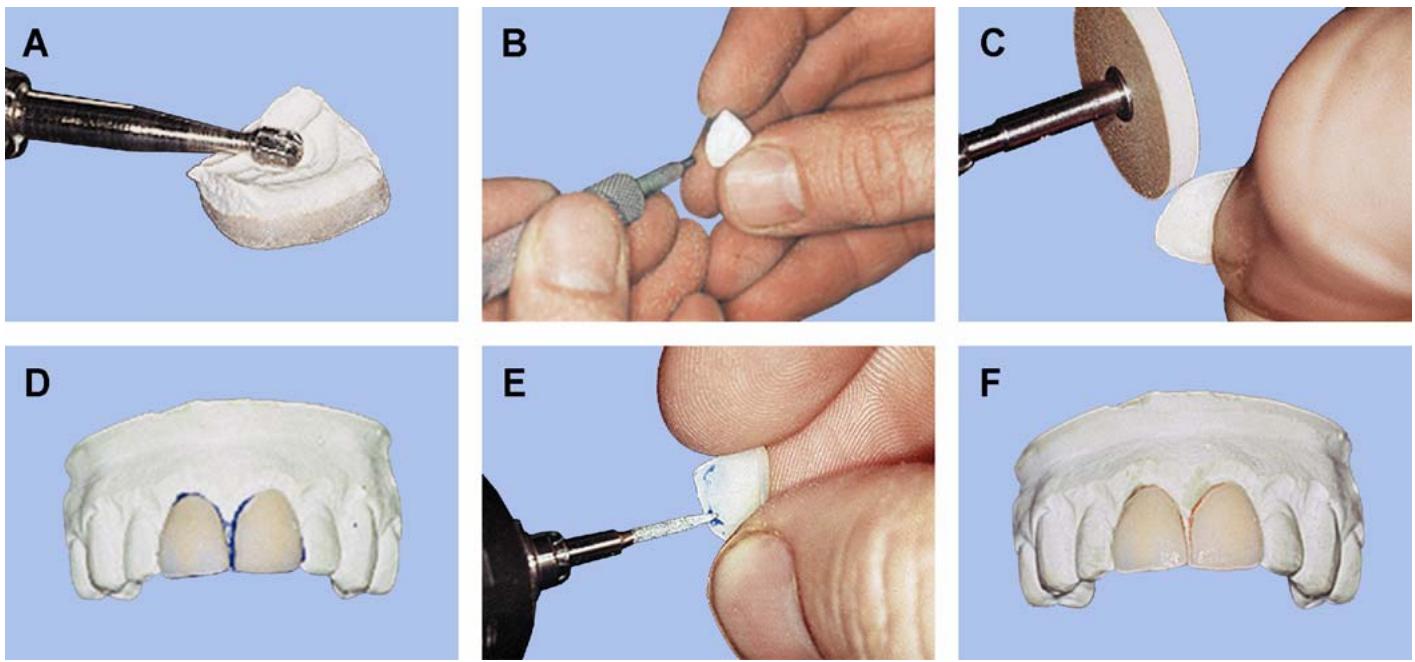
4.9.6.1. Some cases may require porcelain contacts to be added at this point, or marginal areas may need to be added to and refined. To add porcelain, remove the glaze and clean the restoration. Then apply the same porcelain powders originally used during the initial application. Be sure to add enough porcelain to allow for re-contouring. The porcelain addition must be meticulously applied, shaped, and well condensed. If not, the correction will be evident by a chalky-white border that may be hard to hide with extrinsic stains. Fire the porcelain addition under vacuum and at a slightly lower temperature. After all corrections and contouring are complete, stain as needed and glaze.
4.9.6.2. Divest the completed restoration by removing the bulk of the refractory material from the inside of the veneer with a #8 bur. Be careful not to touch the margins (Figure 4.17-A). Finish cleaning the refractory from the inside of the veneer with 25-micron aluminum oxide or glass beads at 40 psi (Figure 4.17-B). Take care during this step to prevent blasting a hole through the veneer or altering the marginal areas.
4.9.6.3. Seat the veneer on the master cast by first carefully removing any overextensions of the margins with a rubber wheel (Figure 4.17-C)
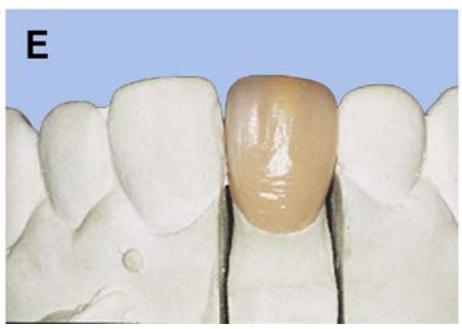
If possible, remove the die spacer from the cast. Use a disclosing medium and gently seat the veneer onto the cast (Figure 4.17-D). Light finger pressure is essential to prevent breaking the thin porcelain veneers. Relieve discrepancies with a fine diamond at slow speeds (Figure 4.17-E). Repeat the procedure until the veneer is completely seated (Figure 4.17-F).
4.9.6.4. Etch the veneers by first covering exterior surfaces with wax and attaching sprue wax to the facial surface to act as a holding device during the etching process. Apply etching gel (7.5 percent hydrofluoric acid) to the inside surface of the veneer. After appropriate etching time has elapsed, neutralize the veneers in a 10 percent solution of baking soda and water or neutralizer provided with the etching gel. Ultrasonically clean the veneer in distilled water.
Figure 4.17. Completing the Veneers.
DentalTechnology.org is dedicated to preserving, teaching, and advancing the craft of dental technology.
This resource is made possible by Russellville Dental Lab, a full-service dental laboratory in Russellville, Kentucky, serving clinicians across the USA for more than 70 years.