¶ Chapter 5 — FIXED RESIN PROSTHODONTIC RESTORATIONS
Reference Edition
This chapter is part of the Air Force Dental Laboratory Manual (2005) – Digitally Restored Edition.
This edition preserves the original publication while correcting OCR errors, restoring formatting, reconstructing damaged tables where necessary, and improving digital readability.
The technical content has not been rewritten, modernized, expanded, or altered.
It is provided as a professional reference. Modern instructional material is published separately throughout DentalTechnology.org.
¶ Section 5A — Introduction
¶ 5.1. Overview
Resin veneered fixed prostheses are becoming increasingly popular in dentistry today. New materials are making it possible to fabricate an esthetic and durable restoration with resin. Resin materials are available to fabricate veneers, inlays, onlays, and full coverage crowns as well as the more traditional metal veneered crowns and FPDs. Resin-veneered restorations are very similar to metal-ceramic restorations in preparation requirements and fabrication technique. All-resin preparations are very similar to the all-ceramic preparations (Chapter 4). This chapter will discuss the fabrication technique for two resin systems currently on the market—Sinfony® by ESPE America Incorporated, and Targis™ by Ivoclar Williams, Ivoclar North America, Incorporated.
¶ Section 5B — Targis™ All Resin Crown
¶ 5.2. Overview
Targis™ has many uses in addition to veneering metal crowns. It may be used as a metal-free crown for anterior teeth, inlays, onlays, and veneers. Metal-free posterior crowns and FPDs can be fabricated with Targis™ in conjunction with a Vectris™ substructure. Vectris™ is a fiber-reinforced composite material that replaces the metal framework. However, Vectris™ and Targis™ should not be used to construct a metal-free FPD with multiple pontics between two abutments.
¶ 5.3. Cast Preparation
A master cast with removable dies must first be fabricated and articulated. Use the techniques described in Chapter 1, Section 1F, of this volume. When fabricating a Vectris™ FPD substructure, it is helpful to leave the abutments and pontic portions in one piece until after the substructure is completed. Avoid sharp edges on the cast because they can damage the membrane during the formation process. The base of the model must also be flat to prevent it from cracking while under high pressure during later steps. Apply a die hardener and allow it to dry completely. Apply two layers of Targis™ Model Separator, waiting 3 minutes between each layer.
¶ 5.4. Metal-Free Bridge Framework Fabrication
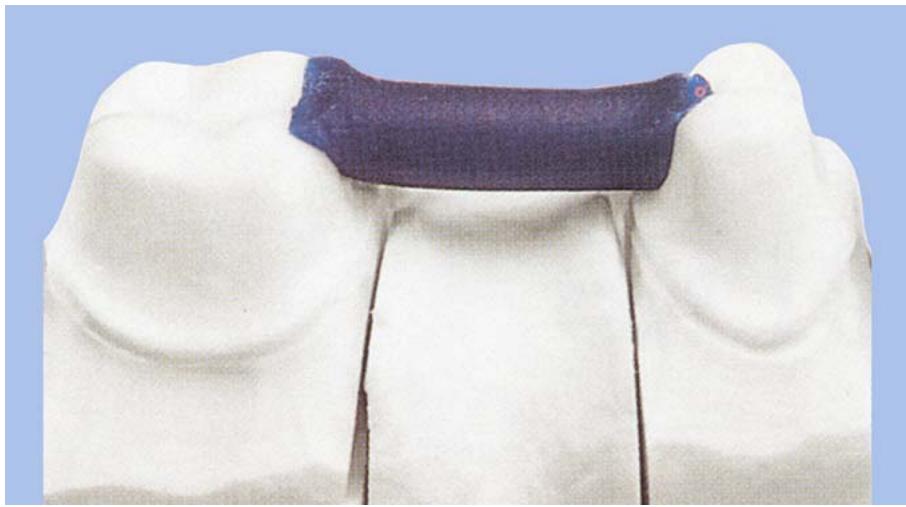
5.4.1. Silicone Key. Place a wax wire with a diameter of at least 3 mm between the two abutments and secure in place. Observe the placement of the connectors when positioning the wax wire. This wax represents the pontic and should be modified by adding wax so it is slightly oval in shape (Figure 5.1). Remove segments of the model not associated with the framework. Use silicone to make a key that covers the abutments and the wax wire. Be sure to adapt the silicone to the underside of the wax wire completely with no voids. Leave the occlusal area open. After the silicone has set up, remove the wax wire. Trim any silicone material covering the occlusal surface to allow light to reach the entire occlusal surface during the curing process. Apply two additional coats of separator to the model.
5.4.2. Spillways. Use a separating disc to cut two perpendicular spillways off of the pontic channel. The spillways will allow excess matrix to flow off during processing of the Vectris™ substructure known as deep drawing. The fiber reinforced composite will be condensed more homogeneously with this technique.
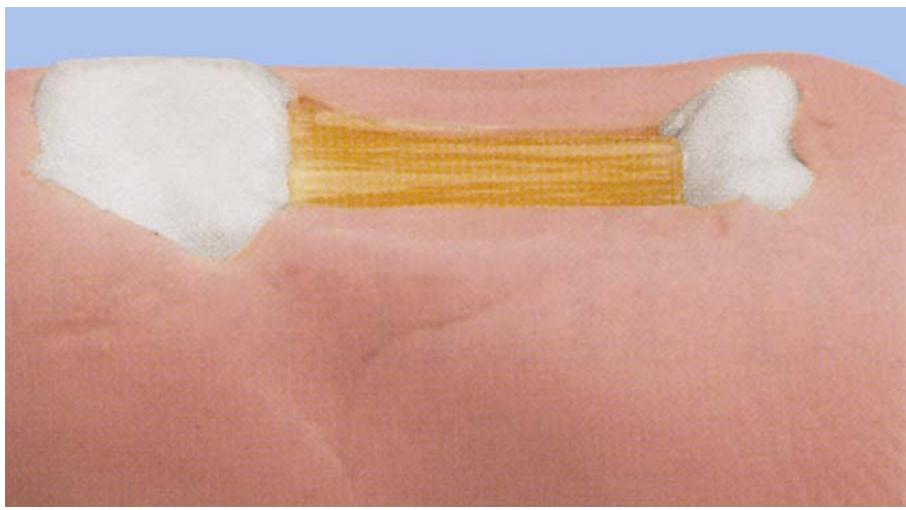
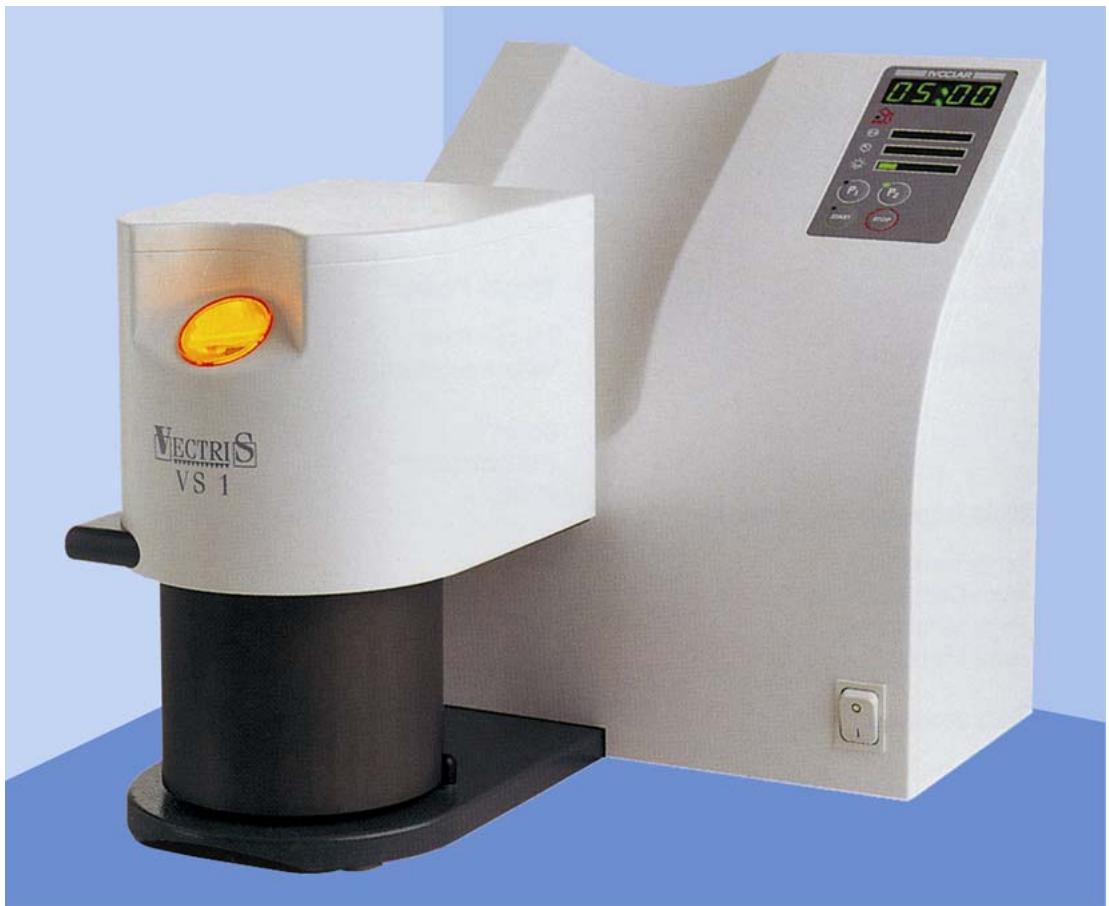
5.4.3. Fabrication of Vectris™ Pontics. Apply Vectris™ glue to the base of the cavity formed by the wire wax. Remove the Vectris™ Pontic from the package and trim a piece of the rope shaped material to fit into the cavity formed by the wire wax (Figure 5.2). Cut a second piece of Vectris™ pontic long enough to cover the entire length of the occlusal surface. Place this rope on top of the
first piece. Use the Vectris™ VS 1 curing unit to form and cure the pontic with program P1 for 9 minutes (Figure 5.3). Be sure to follow the manufacturer’s operating instructions for the Vectris™ VS1 curing unit.
Figure 5.1. Wax Pontic Placement.
natural_image
Close-up of a white ceramic object with a dark purple and blue textured band, possibly a mechanical component or mold (no visible text or symbols)
Figure 5.2. Vectris™ Pontic Placement.
natural_image
Close-up of a wooden bone with white foam filling on a pink surface (no text or symbols visible)
5.4.4. Finishing of the Vectris™ Pontic.
5.4.4.1. Carefully remove the cured pontic without damaging the silicone key. Trim excess material with a carbide bur to conform to the following dimensions:
5.4.4.1.1. The pontic should be slightly higher than wide (oval in shape)
5.4.4.1.2. The diameter must be at least 2 mm and the pontic must touch the abutments in the proximal area.
5.4.4.1.3. The occlusal stop portion must be a minimum of 0.3 mm thick and cover at least 1/3 of the occlusal area.
5.4.4.2. Blast the contoured pontic with aluminum oxide at 1 bar pressure; then steam clean thoroughly.
Figure 5.3. Vectris™ VS1 Curing Unit.
natural_image
Exterior view of a white and black electronic device labeled 'VECTRIS VS 1' with a digital display showing measurement (no readable text beyond labels)
5.4.4.3. Apply Vectris™ wetting agent on the cleaned pontic and wait for 1 minute. Blow any excess wetting agent off with compressed air.
5.4.4.4. Trim the silicone key used to form the pontic. Expose at least 4/5 of the abutment preparation, leaving the margins covered. Also provide a space below the pontic to adapt the frame around the pontic. Apply 2 additional coats of separator and allow to dry. Return the pontic portion to the dies, using a small amount of Vectris™ glue to hold in place if necessary.
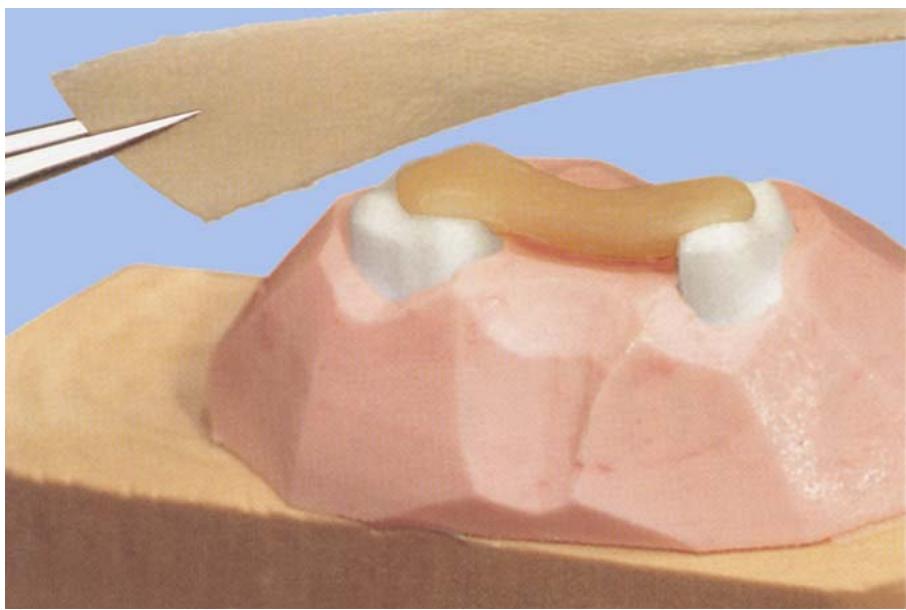
5.4.5. Trimming of the Vectris™ Frame. Trim the Vectris™ frame to a size sufficient to cover both abutments and pontic. For maximum adaptation, make small cuts between the abutment and pontic on each side of the material. Apply Vectris™ glue on the pontic and place the trimmed frame on the model (Figure 5.4). Position the model into the Vectris ™ VS1 curing unit and deep draw and cure the frame with program P1.
5.4.6. Finishing of the Vectris™ Frame.
5.4.6.1. Carefully remove the frame from the model. Trim the frame with a carbide bur to expose the cervical 1/3 portion of the crown. Do not grind on the occlusal surface because this will weaken the frame greatly reducing the strength of the finished prosthesis. The Vectris™ Frame must cover at least 2/3 of the pontic.
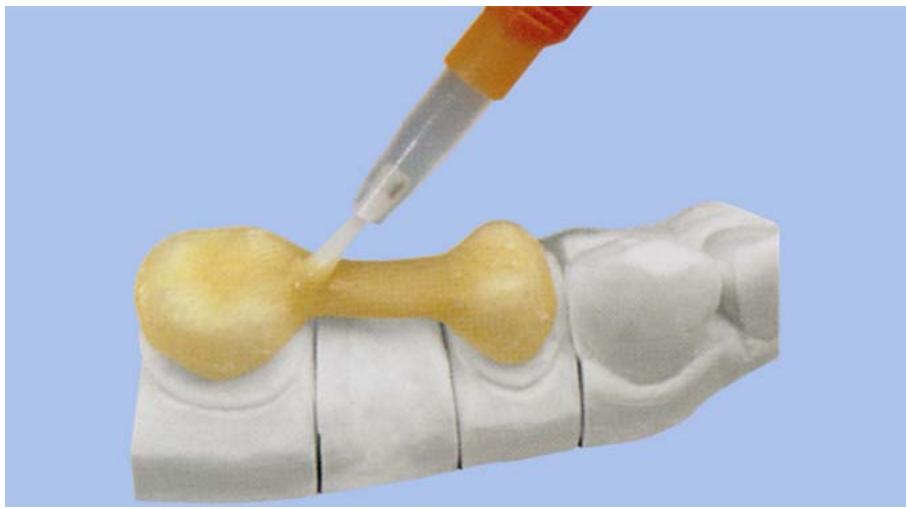
5.4.6.2. Blast the finished frame with aluminum oxide at 1 bar pressure and then steam clean. Apply Vectris™ wetting agent on the frame and wait 60 seconds (Figure 5.5).
5.4.6.3. Remove excess with compressed air. Clean the model of any silicone or other
impurities and apply 2 layers of Targis™ model separator. The frame is now ready for the application of Targis™ resin material to complete the buildup of the restoration (Figure 5.6-A).
Figure 5.4. Vectris™ Framework Application.
natural_image
Dental model showing upper and lower teeth with dental crowns, held by tweezers (no text or symbols visible)
Figure 5.5. Vectris™ Framework Completion.
natural_image
Close-up of a medical device with a pipette dispensing a yellow object onto a white anatomical body (no text or symbols visible)
¶ 5.5. Targis™ Dentin and Enamel Buildup
5.5.1. Application of Basic Shade with Targis™ Base (Figure 5.6-B)
Begin by applying Targis™ base to the entire frame one segment at a time (Figure 5.6-C). Apply the material to the preparation margin. Precure each of these segments for 20 seconds with Targis™ quick-curing light (Figure 5.6-D). After precure is complete, remove the air-inhibited layer with a disposable sponge. Do not to remove the frame from the dies at this time because the Targis™ base is unsupported and easily broken.
5.5.2. Modeling and Layering.
5.5.2.1. Apply Targis™ dentin to the restoration, using the normal dentin or incisal buildup technique (Figure 5.6-E and -F)
The maximum layer thickness is 2 mm. Precure each segment for 20 seconds in the Targis™ quick before moving on. Do not mix the materials because as this will trap air in the buildup.
Figure 5.6. Targis™ Dentin and Enamel Buildup.
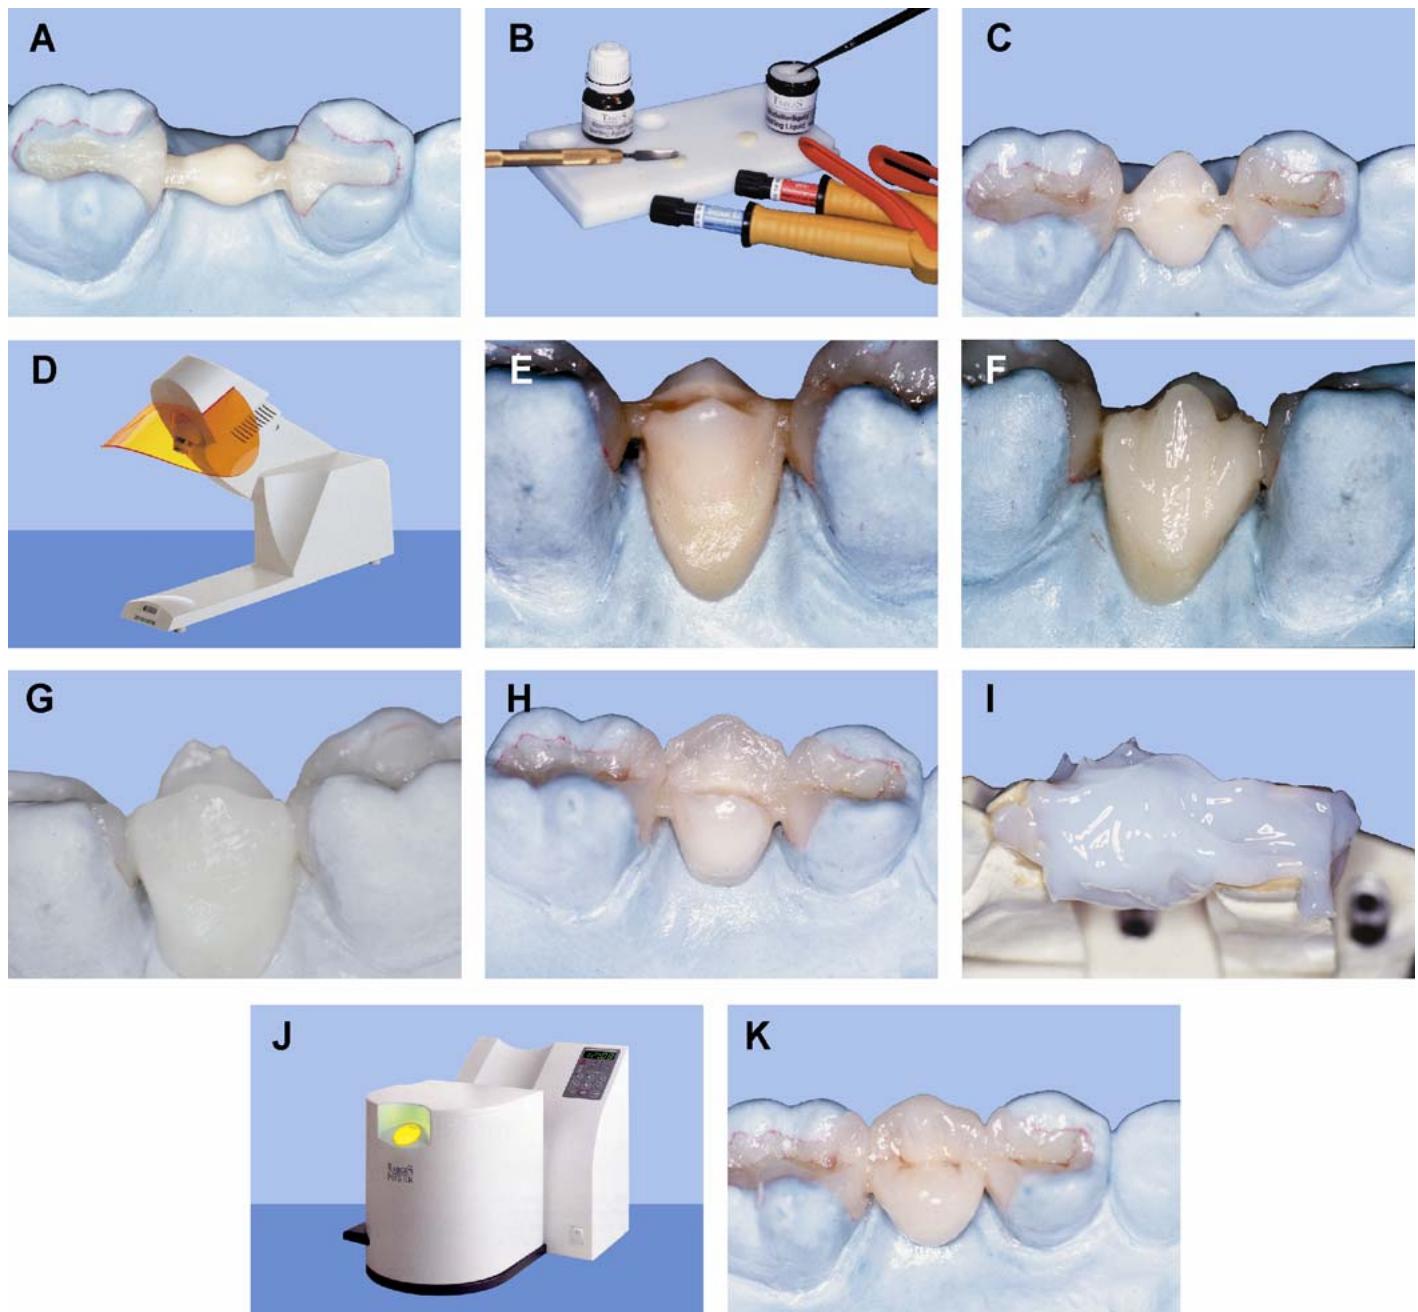
5.5.2.2. Pat the material, using a modeling instrument after it has been dispensed. The modeling instrument can be dipped into a sponge saturated with modeling liquid to reduce the stickiness of the material. After the dentin buildup is complete, the crown may be supplemented, using Targis™ transparent and stains, before the incisal is applied. If using these characterizations, precure each segment with the Targis™ quick for 10 seconds before moving on. Apply Targis™ incisal to complete the contours of the crown (Figure 5.6-G and -H).
5.5.3. Curing with Targis™ Power. Apply a generous coat of Targis™ gel to the restoration to prevent formation of an air inhibited layer during curing (Figure 5.6-I). Place the restoration into the Targis™ power curing unit. Heat and light cure it for approximately 25 minutes on program P1 (Figure 5.6-J). Remove it from the unit after curing and wash away the Targis™ gel with running water.
5.5.4. Finishing and Polishing. Use carbide burs to accomplish any necessary final contouring. Follow this up by prepolishing the restoration with pumice and a wet brush wheel on slow speed. Do not apply pressure while polishing; slow speeds with little or no pressure give the best results (Figure 5.6-K). Apply Targis™ polishing paste to the restoration and polish without pressure at 8,000 to 10,000 revolutions per minute (rpm). If the desired high gloss is not achieved, the restoration was polished too quickly and with too much pressure.
¶ Section 5C — Sinfony® Resin-Veneered Metal Crown
¶ 5.6. Overview
Sinfony® is a light-curing composite system used for veneering fixed and removable restorations with metal frameworks and the individualizing of acrylic and porcelain teeth (Figure 5.7). To prevent fractures with Sinfony®, the material must not be applied less than 0.8 mm for facings and not less than 1 mm for occlusal facings.
5.6.1. Metal Framework. The framework for a resin-veneered metal crown is very similar to the framework used for a metal-ceramic crown. It is recommended, though, that incisal guidance be in metal to prevent veneer material from shearing off during lateral and protrusive excursions. If the veneer is not under pressure during lateral and protrusive excursions, the resin can be freely extended up to 1.5 mm. For information on the design and fabrication of metal frameworks, see Chapter 2, Section 2C, of this volume. Be sure the metal used is indicated by the manufacturer for use with veneering composites. Finish the framework, polish nonresin bearing surfaces, and steam clean before veneering with Sinfony (Figure 5.7-A).
5.6.2. Retention System. Mechanical (such as beads) or a chemical bond can achieve retention between the metal substructure and the resin. The ESPE Rocatec® adhesion system is recommended for use with Sinfony®. Rocatec® is a three-step system that chemically bonds the composite to the metal with no marginal gap or any other mechanical retention. The quality of the chemical bond achieved with Rocatec® depends on strict adherence to the manufacturer’s directions. If no chemical bonding system is being used, mechanical retention such as beads will need to be incorporated into the veneer’s metal surface. Procedures for Rocatec® are as follows:
5.6.2.1. Step One—Rocatec® Pre (Figure 5.7-B)
Use the Rocatec® Pre side of the Rocatector unit to blast each veneer surface individually. This will clean and create rough indentations on the metal’s veneer surface. The blasting time for each restoration is approximately 10 seconds at 2.5 bar pressure. If you are using nonprecious metal, it may be necessary to increase the pressure by raising the regulator on the rocatector unit.
5.6.2.2. Step Two—Rocatec® Plus (Figure 5.7-C)
Use the Rocatec® Plus side of the Rocatector unit to again blast each veneer surface individually. This creates a partially embedded adhesive coating into the alloy’s texture. Blast each restoration for 13 seconds at 2.5 bar pressure. The Rocatector unit is equipped with an acoustic timer as an indicator for completion. It is vital that the blasting direction be perpendicular to the metal surface at a distance of 10 cm. When blasting is complete, there should be a uniform dark coloration on the metal to indicate correct coverage of the material. Do not touch the veneer surface once Rocatec Plus has been applied because the bond with the Sinfony® veneer can be compromised.
5.6.2.3. Step Three—Silane Coupling Agent (Figure 5.7-D)
The Rocatec® Plus does not provide an adequate bond with the veneer material on its own. Apply a coupling agent (ESPE Sil) to provide the chemically binding adhesive necessary for the Sinfony® opaquer. Proportion ESPE Sil into a clean dappen dish. Using the special brush provided with the system, apply the solution by soaking the brush tip and brushing over the surface of the veneer. Allow the ESPE Sil to dry at room temperature for 5 minutes; then coat it immediately with opaque.
Figure 5.7. Sinfony® Resin-Veneered Crown.
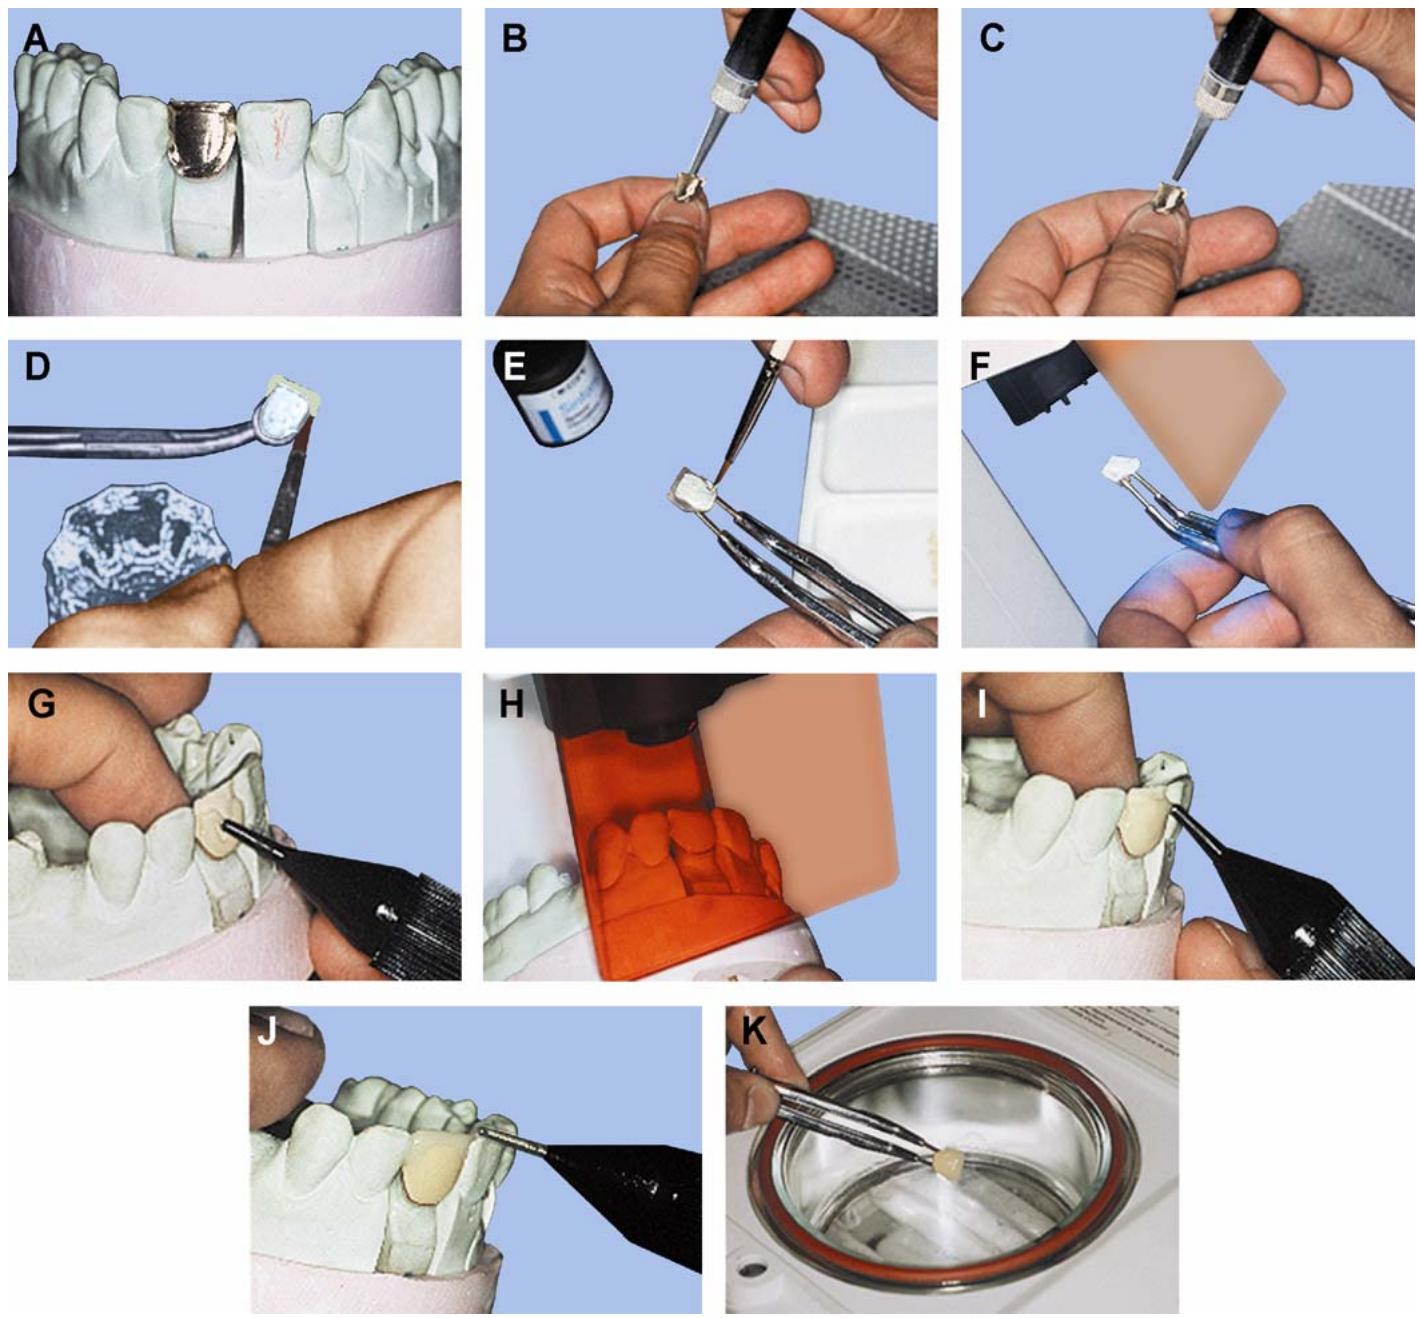
5.6.3. Opaque Application (Figure 5.7-E)
5.6.3.1. Dispense the appropriate opaque (powder and liquid) onto a ceramic mixing tray and mix with a plastic spatula. Mixing time is 45 seconds. Apply a thin masking coat of opaque to the veneer surface. Light cure it for 5 seconds, using the Visio Alpha light curing unit (Figure 5.7-F). Apply subsequent coats and light cure until sufficient masking of the metal has been achieved.
5.6.3.2. As an alternative, coat the entire veneer surface and polymerize it with auxiliary program 1 of the Visio Beta Curing unit. Intensive opaques can be applied at this time to achieve desired effects.
5.6.3.3. Mix intensive opaque to the desired shade and apply to the necessary areas. Cure minimal amounts of the intensive opaque for 10 seconds with the Visio Alpha light; cure larger areas for 30 seconds. Check for complete curing of the opaque, using the wooden tip of a brush and, if necessary, cure for additional time. It is important not to touch the veneer surface because the chemical bonding will be affected.
5.6.3.4. After the opaque layer is completed, immediately begin applying the dentine layer.
5.6.4. Dentine Application.
5.6.4.1. Apply a separating agent to any areas of the cast that may be exposed to the Sinfony® materials. Start by building up the dentine directly from the dispenser, or with an instrument, in layers no thicker than 1 mm (Figure 5.7-G). Because Sinfony® materials are light sensitive, keep the dispenser closed when not in use.
5.6.4.2. As each 1 mm layer is applied, cure for 5 seconds with the Visio Alpha light (Figure 5.7-H)
This intermediate 5-second polymerization leaves a smear layer on the resin that is required for bonding with the next layer. Never grind on or remove this smear layer until the entire buildup has been completed.
5.6.4.3. Sinfony® Opaque Dentin can also be applied at this time to reduce translucency in appropriate areas. Due to the higher opacity of the opaque dentin, ensure these materials are cured fully and not applied thicker than 1 mm. Continue applying Sinfony dentine layers until the correct dentin contour has been achieved (Figure 5.7-I).
5.6.5. Incisal Application. Overlay the buildup with the Sinfony® incisal material in the same manner as the dentine (Figure 5.7-J). Cure each individual layer for 5 seconds with a Visio Alpha curing light. Once the restoration has been built to contour, accomplish final polymerization in the Visio Beta curing unit on the main program for 15 minutes under vacuum (Figure 5.7-K).
5.6.6. Finishing the Resin Metal Veneer. Do not grind on the veneer until the final polymerization is completed in the Visio Beta curing unit. Contour the veneer with cross-cut burs. Accomplish additional smoothing with rubber polishers, finishing from coarse to fine polishers. Rubber polishers are especially useful to create a smooth metal-to-resin junction. Use a small white buff wheel without polish to prepolish the veneer. Next, use the opal high luster polishing paste on a polishing wheel to create a high luster. Clean the restoration in an ultrasonic or under running water. Do not use a steam cleaner because heat from the steam cleaner may cause marginal gaps or fractures due to the different thermal expansion values of the resin and the metal.
5.6.7. Adjustments after Finishing. If additional resin must be applied after finishing, roughen the surface, moisten with Sinfony Activator, and wipe off any excess activator with a clean cloth. Proceed to buildup and cure as described in the preceding steps.
DentalTechnology.org is dedicated to preserving, teaching, and advancing the craft of dental technology.
This resource is made possible by Russellville Dental Lab, a full-service dental laboratory in Russellville, Kentucky, serving clinicians across the USA for more than 70 years.